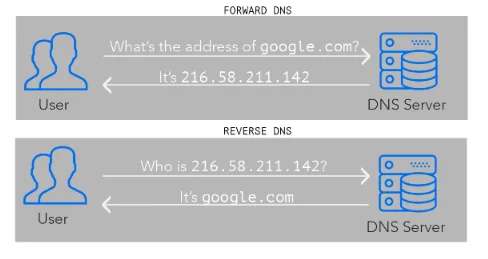
Configure Reverse DNS on VPS is essential for proper email delivery and server identification. This step-by-step guide explains how to set up rDNS, enter your hostname, save changes, and verify the record quickly and easily.
Step 1: Log in to Your VPS Provider Panel
-
Open your browser.
-
Go to the login page of your VPS provider.
-
Enter your credentials and sign in.
Step 2: Go to IP Management or Reverse DNS / rDNS
-
Look for a menu like:
-
Network / IP Management
-
Reverse DNS / rDNS
-
Sometimes under Server Settings or Networking
-
-
Click to open the rDNS section.
Step 3: Select the IP Address
-
If your VPS has multiple IPs, choose the one you want to configure.
-
Usually, there’s a list of IP addresses with an Edit / Configure button next to each.
Step 4: Enter the Hostname
-
In the rDNS / PTR field, type your fully qualified domain name (FQDN), for example:
-
Make sure the hostname matches your DNS A record for that IP.
Step 5: Save or Apply Changes
-
Click Save, Apply, or Update.
-
The changes may take a few minutes to a few hours to propagate.
Step 6: Verify the rDNS Record
-
After some time, check with:
-
-
It should return your hostname.
-