This tutorial will guide you through the process of accessing your VPS using PuTTY. This tool helps you securely administer and control your Linux VPS from a command-line based interface.
Step 1: Open PuTTY
- Launch PuTTY on your computer.
- The PuTTY Configuration window will appear.
Step 2: Configure the Connection
Fill in the information in the Session category:
- Host Name (or VPS IP address)
- Port: 22
- Connection type: SSH
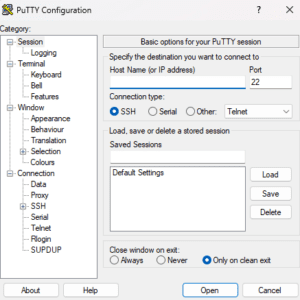
Then click Open to continue.
Step 3: Security Alert (First-time Login)
If this is your first time connecting, PuTTY will show a security alert.
- Click Accept to continue.
Step 4: Enter Login Credentials
When the terminal window opens:
1) Enter your VPS username: root (default)

2) Enter your VPS password ( input will not be visible)

3) Press Enter to log in
Step 5: Successful Connection
Once connected, you will see a terminal window. Show:
[root@hostname ~]#
This means your VPS is now accessible and ready to use.